Water bills have continued to increase in modern times. A running toilet will make your life more difficult than any other. It is also ecologically very harmful to the environment. You may also hear a disturbing sound in case of silence. If you don’t replace the leaky toilet, it will be very inconvenient. A lot of people panic, especially if there is no float. But how to fix a running toilet without a ball float?
We’ve prepared this article to make your life easier while we troubleshoot your issues. Let’s get started!
How to fix a running toilet without a ball float
Step 1: Learn your valve
This particular method has been successful in the past. The main difference between modern toilets and tanks of the early ages is the ball which is still a floating object.
It is much smaller than a golf ball and can be fitted into any compact tank.
The filling valve is usually mounted on the tank. This fill valve is more efficient than a standard ball valve, and it prevents filling of the tank. However, they come with a variety of flotation aids to better accomplish the task.
So you can integrate a cup float into your toilet by using less expensive flushes. The pressure required for the cup float is correct.
Flush cisterns are cheaper and more flexible than small bathroom ball valves, which look like a faucet but take up less space. Read on if you’re having trouble with double-hunting.
This fill valve controls the water level in the tank. Unfortunately, if the fill valve isn’t working as it should, replacement is the best option to fix a running toilet that works without a float.
The next steps will show you how to replace the valve.
Read Also: How To Unclog The Toilet When Nothing Is Working?
Step 2 – Replace The Valve
Then get rid of the valve. Install a new one. It is especially important to replace the valve if it does not seem to be working properly or if it is damaged. Plumbers recommend that you replace your fill valve every five to six years to avoid interruptions and to keep flushing continuously.
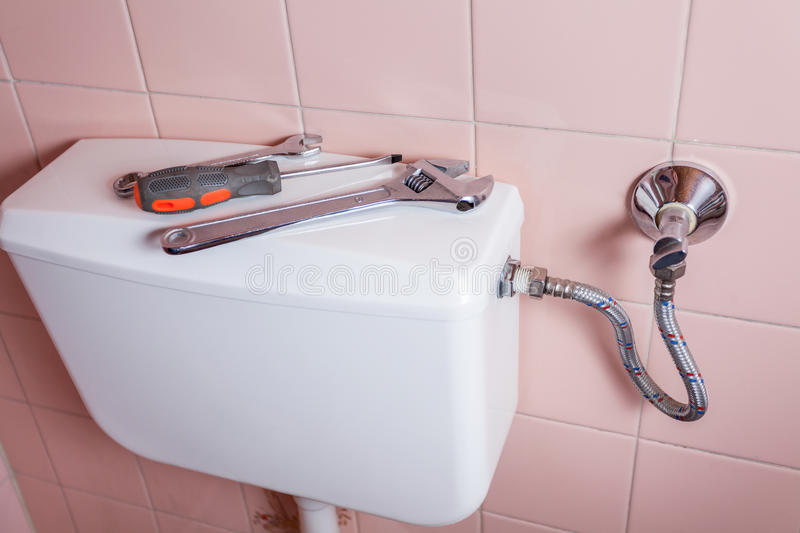
A wrench and a water container are needed to remove the fill valve. As a safety measure, first turn off the water supply tap. Then rinse the tank thoroughly. Now we are back in business.
Step 3: Remove The Old Valve Base
Take the time to inspect your old valve. If the base is not damaged, it will be easy to replace. To pull the tube up, you will need to reach the base of the fill valves. You can use a screwdriver or hammer to remove it if it has hardened.
Step 4 – Position The New Valve
You can now position the new valve. Perhaps you have already seen a base for a valve. A similar foundation should be used for the new valve base. You are unlikely to need it, as we have the same valve base we used before.
Simply push the new valve down onto the base of your tank. You will now need to lock the valve ring. You will need to secure the lock in order to secure the replacement tube to the overflow tube.
It is important to remember that the water level should be adjusted at this point so that it does not rise too high. This will prevent the toilet tank and the float ball from filling up.
Read Also: How To Prevent Blocked Drains?
Step 5 – Make Sure It Works
Give your final touch of self-expression. Check that the main faucet is working as it should, then turn off the water.
There is a small chance the process will go haywire. If your old fill valve base has not been damaged, this method will allow you to adjust the float on the ball less toilet.
Everything is fine, but what if the base of the fill valve becomes unsuitable for further use after the entire replacement process?
The whole unit must be disassembled and replaced. It is not more difficult than the last task.
We will discuss the next steps for a full replacement. This step will require the use of some essential tools which have been mentioned previously.
Optional: Completely Change The Valves
Make sure to empty your bathroom tank. It is best to place the small container or tray under the water supply step, so that the water flows into the container / tray.
This is an important step, because the water will not flow in a single drop.
To disconnect the tube, place your hand on the base of the tank. Then use an adjustable wrench to remove the screw.
That’s it! That’s it! You can now remove the complete set and immediately dispose of it in the trash. Now you can easily mount the unit by adjusting its height to match the height of the tank and overflow tube.
It is possible to operate the toilet by flushing the toilet without using a toilet float or tank. You won’t have to worry about the toilet functioning after flushing.
Conclusion
These steps will help you fix a running toilet quickly. You should only buy the highest quality tools and valves. You will be more satisfied with the quality of your valves.
Change your valves regularly. You should have your toilet professionally checked if you notice any cracks or other deformations in the tank.
We hope you now have all the information you need to fix a running toilet without using a flop ball. Have a good rinse, and until next time!
See Also: Why Is My Poop So Big It Clogs The Toilet?