Learn everything in detail on how To Install Vinyl Siding In easy steps?
What is Vinyl Siding?
Vinyl siding is a plastic exterior siding for small apartment buildings and houses. Most commonly is used for waterproofing, decoration, and imitating wood clapboard. Moreover, it is used instead of other materials such as aluminum or fiber cement siding.
Majorly, it is an engineering product that is manufactured primarily from polyvinyl chloride (PVC) resin. In other Northern countries, a similar material relating to this is termed uPVC weatherboarding.
History of Vinyl Siding
Vinyl siding was introduced as a replacement for aluminum siding in the external market in the late 1950s. It was produced by an independently owned manufacturing plant called Crane Plastics in Coulombs for the first time.
Later in the 1970s, the industry changed its formulation to improve its production, impact on customers, and range of colors. At present, it is gaining popularity due to its
- Durability
- Versatility
- Easy installation process
- Ease of maintenance
- Modern manufacture and many more
Two Layers of PVC
Furthermore, for the time being, it is manufactured by co-extrusion that comprises two layers of PVC.
a) The top layer is weatherable and made up of durable material. It contains up to 25% of siding thickness. However, the part exposed to the Sun will begin to fade over time.
b) The lower layer is made up of calcium carbonate (limestone) as this reduces cost. Also, it equals fluid during manufacturing. However, lubricants are also added for smoothening the industrial process.
Specs and product variables
The thickness varies from 0.035″ in cheaper grade siding products up to 0.052″ in highest grade products. But that usually differs from manufacturer to manufacturer. However, 0.40″ is somewhat builders’ standard grade.
Chemical formula of Vinyl Siding
The most crucial advent of this siding is UV coating that some manufacturers utilize. It can impact life expectancy as the formula is one of the most important things concerning quality and Durability.
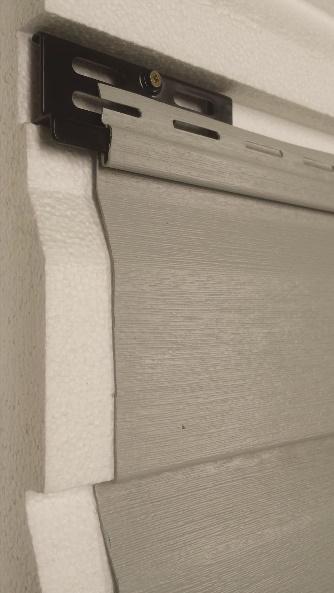
Locking system
Vinyl siding is produced with a unique partial fastening or locking system. That is why its structure can be either rolled or given an extruded lock, depending on the process. Furthermore, the loose nailing allows for float creating expansion and contraction features relative to varying temperatures.
Is Vinyl siding safe for Health?
It was best fit for use until a rare cancer of the liver named angiosarcoma was traced in vinyl chloride used in PVC. Therefore, all the siding processes require preventive measures to be well taken care of while working. Moreover, some standard limits were also established by occupational safety and health administration for this process.
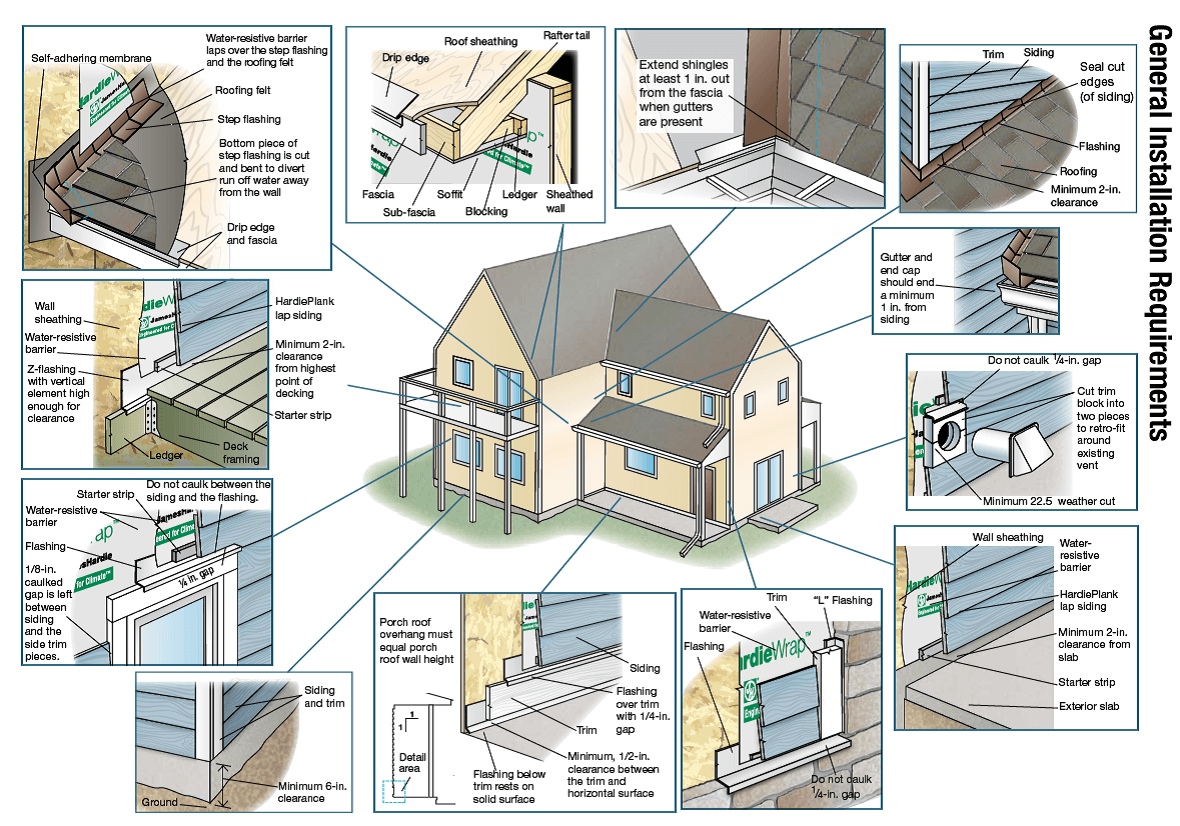
Materials and tools required for Vinyl Siding Installation:
Its feasible installation process and Ease of maintenance can cut off price nearly in half if someone is willing to do the work himself. In addition to that, you could reduce the substantial cost if someone follows the safety installation process on his own.
The Vinyl siding installation process guide is sold all over the world and comes with fairly complete instructions. Moreover, it is an excellent alternative to regular house paint and does an excellent job of dressing up walls.
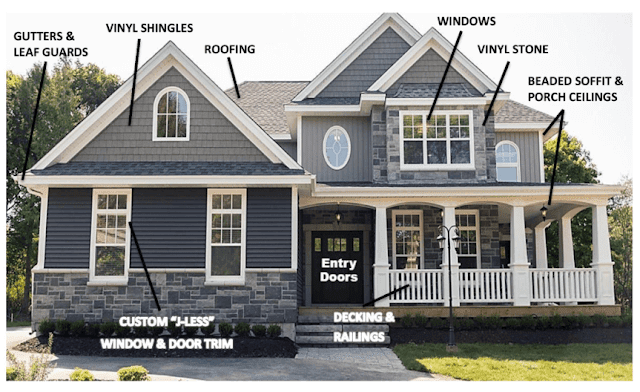
Besides all, its wall-mounted utility equipment, attractive corners, windows, and doors are different from conventional sidings. A standard 12-ft length should be able to slide every full-length side when at least half an inch is already installed.
Let’s know discuss how to install vinyl siding in an easy way.
How to install vinyl siding in 15 easy steps?
Step by step process of vinyl siding installation is given below for your guide:
Step 1 – Soffit and Fascia cutting
When cutting vinyl siding and soffit, one should wear safety goggles as he/she has to pass through all cutting and nailing operations. Also, always install the plywood on the saw for a smoother, cleaner cut, especially in cold weather.
Avoid closing the blades entirely at the end of the stroke for a neater cut. Instead, taking the help of a utility knife, score the vinyl face up with medium pressure and snap it one half evenly.
All siding and soffit pieces have nail slots that allow for expansion and hold the heads out 1/32 to 1/16 inch. The second band of J-channel along the soffit edge is adjusted as it meets the house’s walls requirements.
Step 2: Choose the right nails.
Always galvanized stainless steel or aluminum roofing nails are recommended with a head diameter of 3/8 inch. These should be long enough to penetrate the nailable base that is at least 3/4 inch.
To accommodate any change, nail two J-channels diagonally between the corner of the house and the house’s roof. In case there are existing soffit vents, remove them and install vented soffit materials.
Good nails cut your siding in lengths with a 1/4-inch gap for expansion. Vinyl siding installation allows for material expansion and contraction by weather changes.
Step 3 – Removing the gutter.
Slide performed lengths and eliminate the gutter area of fascia cover, which is under the gutter apron. Next, use the pre-painted and galvanized nails for carefully nailing the upper portion.
Use hammer sensibly as crooked nails will distort the siding panels, causing the boards to remove. Always hammer the nails in vinyl siding slots that help in eliminating down-spouts and light fixtures.
Install furring strips to even and smooth walls; please take appropriate measures to establish an even surface.
Read More On How to Improve the House.
Step 4 – Siding the walls.
One should begin all processes by loosening or taking off all easily removable obstacles. For example, the utility trim installed under the eave will meet at the top edge of the last full-width row of siding.
For cutting the top row of siding, J-channel is used instead of utility trim when best-fit height for a metal starter is determined, chalk line around the entire house for referencing purpose, and mark positions on walls.
Step 5 – Rigid foam sheathing
Very next to siding and referencing the walls by marking, one should nail strips of 1/2 inch to both sides of corners and then nail the corner trim over these strips.
Sheath the first few feet of walls with insulation. That makes you ready to install siding on the lower portion of the first wall.
Step 6: Join lengths of siding.
Once all foam sheathing has been done, the next stage includes snapping each length of siding incorrect place so that its bottom lip hooks under the starter strip. For accommodation of expansion, make sure to place the nails in their slots precisely in the center.
Lap one length over the other approximately 1-inch for joining two sizes of siding. Walk leading to front door approaches from left, have a proper left-over lap on a siding.
Step 7 – Dealing with obstructions.
For new construction, furring strips are not usually necessary. Lath strips are mainly used for furring a wooden surface. However, 1-by-3-inch wood with masonry nails is required for the masonry area to be sided by the Vinyl siding process.
Completely furring should be installed around doors for horizontal siding while structural lumber of 12-inch is considered for vertical siding.
Step 8 – Plywood support required
For covering the bottom of the existing siding, you will need to maintain the starter-strip height on both sides of the deck and trim the siding to fit above the deck. For all these works, strong adjacent support is required.
Moreover, you can also utilize rigid foam backing, but plywood support will best serve the best. The Vinyl siding installation process cuts the deck conventionally and presses the cut section into J-channel.
Step 9 – Insulation of Vinyl siding
For leveling out the exterior of a house, house wrap or foam board insulation helps us. This type of insulation can change and flatten the contour of a panel.
For that, first of all, you will have to snap the cheek reel by stretching a chalk line from one nail to the other present at the next corner. Ensure that line is leveled equally. The same procedure is to be done around the entire house.
Secondly, install inside and outside corner posts and splice them evenly. Cap these suitably with the help of a sheet. Also, cover the entire overlap joints.
Step 10 – Window and door trim
At last of the insulation process, caulk the J-channel where it meets the conduit. When one reaches the window area or door frame, he/she should cut a trim channel to match the sill length and then nail it into the desired place.
After it, cut the top channel 2-inches longer than the window or door width. This time cutting off the back of the channel flushes and let the facing edge run long away.
Notch the next piece to fit. Then, with the insulation backing in place, install the next siding within one row of the bottom of the window or door.
Step 11 – Open and closed eave installation
Initially, mark pencil referencing to the walls of the house. These footprints will be parallel with the lower edge of the wood fascia board at the end of each wall for open overhangs. Measure up to 7/8 inch and strike a chalk line
For the outside area that needs ventilation and air crossing throughout, a perforated soffit is used. Next, J-channel and F-trim length shapes are inserted into the end. Line all these panels correctly and after this, insert the locking leg.
Step 12 – Meeting the soffit
The Vinyl siding installation process is now towards its completion as when siding is within a foot of conclusion; nail lengths are trimmed to the wall just below the soffit.
Measure the last piece and nail the second to last row in place. A knife or lightweight cutter is used to score the siding lengthwise.
Moreover, 3-D painted nails colored are the best solution to match your siding. If someone opts for this method, it is recommended that to insert one nail every 6 to 8 ft.
Step 13: Turn corners using Vinyl siding.
When turning corners, a proper angle with a specified dimension is essential. Back-to-back J-channels create additional support for the panels
1/2-inch J-channels cut the length and install the nails into the overhang. Soffit panel supporting install a frieze runner on bottom of the fascia board and then complete soffit installation.
Step 14 – Closing the soffit ends.
An under-sill Vinyl siding trim along the top fascia is applied for installing the nail panels. Then insert the leading edge of the fascia using a snap-lock punch tool. For proper fitting and avoiding waviness, run the F-trim straight without any bends.
For making a corner cap, mark the vertical centerline on the back cut. A 90-degree section of the bottom flange is cut out from the central portion. Two portions of 45 degrees on each side should be visible clearly.
Step 15: Fasten all clips.
The last step is to tighten all-aluminum clips to the edge of the siding while still allowing lateral movement. Therefore, you should place these clips at least at a distance of 12 to 16 inches.
To finish the loose ends, trim the roofs with the help of a crimping tool that cuts each length of siding to match the roof’s slope and nail the siding in place.
Advantages of Vinyl siding installation
Once the entire process gets completed safely, you can have the following benefits:
- An improved look of the house without painting
- A very affordable choice
- Its color is 100% homogeneous and viscous
- Installed Vinyl siding is long-lasting
- Relatively easy to install in comparison to others
- Maintenance is relatively inexpensive
- Rough walls are evenly furred with, and many more
Disadvantages
Once it is purchased, you can try to install it yourself. But unfortunately, if you do not install it correctly, you may face several issues. That is why many people rely on a contractor for their installation. A few adverse shortcomings of them are listed below:
- It is simple but not fool-proofed
- If the siding is nailed too tightly, it will wrap or expand and can even break into pieces.
- Its construction warranty only last one year
- Siding might begin to show its age after few years due to irresistible climate changes.
- If someone’s house is historically significant, Vinyl siding may devastate the home’s value.
- It may also allow moisture retention below its surface.
- It never has the same look like natural wood as it is a plastic product.
Conclusion On How to Install Vinyl Siding
Million people think that it is precisely a suitable option for decorating and protecting the walls of a house. So, they usually ask How to install vinyl siding in 15 easy steps?
So, this complete guide is for them. However, it will prove beneficial as the installation price almost gets cut to nearly half if you follow this entire procedure yourself.
Also, it is an excellent alternative to paint your houses after regular intervals. Moreover, with modernization, the trend of renovating houses is shifting towards installing Vinyl siding instead of traditional oil and water painting on walls.